Showing posts with label Fall. Show all posts

Sunday, November 11, 2012

Frosted Gourds


I am not sure why we decided to do this, other then I had seen some people do it to mason jars on Pinterest and thought I would give it a try.  The girls had picked out an over abundance of gourds at the pumpkin patch this year, so I just wondered how they would look frosted.

I started with watered down Elmer's glue (1/2 glue, 1/2 water), a paint brush, Epsom salt, and GOURDS!


I painted the glue mixture on the gourds.


Then I rolled it in Epsom salt.


Repeated on the other side and left it to dry.


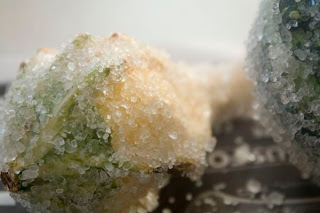
Well that was easy enough.  After I did a couple the girls decided they wanted to help.  They didn't get the glue quite as even, but that didn't matter.  They still looked frosty.


I really think they turned out pretty as we head toward colder weather.  Frosting your gourds makes them fit the winter scheme more, so you can display them a little longer. Unless you are like me and really don't decorate much by the season in which case you will have frosty gourds until they get mushy in March! Here are my frosted gourds with some unfrosted ones. We did a couple little pumpkins too!


Friday, October 5, 2012

Autumn Leaf Chromatography


The leaves around here's are just now really starting to show some color, and many of the trees are still entirely green.  I found this leaf chromatography experiment (from Almost Unschoolers) that predicted what color leaves would turn. I decided to try it with the girls.  It was a bit advanced for them, but they at least had a fun time collecting and tearing up the leaves. They did think the colors were cool too even if they didn't care about the fact that they could predict the future color of the trees.

Obviously the first step is to collect a variety of leaves: green, red, and yellow.  I tried to get a few sets from the same tree, so we had one green leaf and one that had already changed. We used a red maple leaf and a green leaf from the same tree, a maple leaf from another tree, a yellow mystery leaf that I think is from an elm  , a green one from the same tree, a dark green leaf from a mystery tree, a redbud leaf, a pear leaf, and what I think is a walnut leaf.


Then we torn up the leaves in some clear glasses.


We added enough rubbing alcohol to cover the leaves and waited.  It seemed like we had to wait a couple hours for the colors to really show.  I think part of it may be that we picked the leaves the day before, and they had dried out some.


After sitting for a couple hours most of the colors were apparent in the glasses.  At this point we added strips of coffee filter to each glass.  


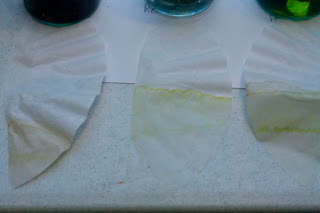
We allowed those to sit for 3-4 hours, and pulled out the. coffee filter strips on e it looked like they had stopped absorbing the rubbing alcohol.  On the filters we observed bands of color.  There was at least a band of color which was the me as the color the leaf appeared when we started.  Most of them also had a second band.  For the green leaves the second band of color was what they would most likely turn as the weather cooled.

My walnut leaf had a yellowish brown band as well as a green band, the redbud had a yellow band as well as a green one, and the pear leaf had a brown band as well as a dark green one.

These were my elm? leaves.  One has a yellow line as it had already turned; while the other has a yellowish green line int he same spot.  They both have the brown line at the top.

These are my maple leaves.  The red one had a dark brownish band at the top ; while the green one had the same brownish band as well as green bands at the bottom.
From this experiment it looked as if most of our leaves we re going to turn some shade of brown.  We did have a couple yellow or yellow with brown, but even the red didn't give a really clear red.  Again it may have been because the leaves were dry as the red leaf didn't give much color at all (very surprising).  You could appreciate how the green leaves did have other colors hiding in them that showed up in the filter though.

I tried to explain to the girls that the green leaves were producing chlorophyll which is green, but as the weather cooled of they would stop and any other colors in the leaves would be seen.  By this point they had lost interest (such short attention spans), but maybe the idea will stick.  Once they are older I am sure they will enjoy it more.


Tuesday, October 2, 2012

Turkey Cookies


Last year I wanted the girls to be able to make something to take to our Thanksgiving dinner, so we made these cute little turkey cookies! I have seen a couple variations of these on pinterest, but here is what we did. 

Ingredients:

Nutter Butters
Oreos
Regular size Reese's Peanut Butter Cups
Icing (we used decorators icing, but any icing that stays put will work)
mini M&Ms
jellybeans

Start by placing icing on the back of your peanut butter cup and sticking it to a Nutter Butter.  Then using more icing to hold them in place stand both the Nutter Butter and peanut butter cup up on an Oreo.
I had Nathan do a lot of the icing, so I could take pictures.
Then draw on the faces with icing.  It is pretty much just making a fat T with the icing, so you can add eyes, a beak, and a waddle (the little hanging down thingy).


Add 2 mini M&Ms for eyes, an orange jelly bean for the beak, and a red jelly bean for the waddle.  Then squirt icing across the top of the peanut butter cup, so you can add jelly beans for feathers. Each of ours had five feathers.  We also added two yellow jelly beans at the bottom of the Nutter Butter for feet.  The girls got to choose all the M&Ms and jellybeans we used.


Then you have cute little turkey cookies for your Thanksgiving get together!


The girls were pretty happy with their turkeys!


And just for fun here is cute, little baby Eli on his first Thanksgiving!


Thursday, September 27, 2012

Melted Crayon Leaves and Apples


Yet another idea I saw somewhere on Pinterest and have been wanting to try.  What I saw was kids coloring on  a candle warmer, but I thought my griddle turned down real low would be even better!  So we set out to make some apples (to follow our apple picking adventure).  I started by having Bria pick out red, orange, yellow, and green crayons.  Then I also had her remove the papers (she has always been good at this).


The lowest setting my griddle has is 150 degrees, so I turned it to that for a few seconds and then turned it off.  It really doesn't have to be too hot to melt crayons.  I places a sheet of waxed paper on the griddle and let the girls draw.


I think they ended up going through 6 or 7 sheets before they lost interest in the griddle.


Then I started cutting apple shapes out of the crayon covered waxed paper. The girls also wanted leaves, so we added some of them.  They tried, but had a hard time getting shapes they liked.


We ended up with a good variety, and the girls decided they should go in their bedroom windows.  Theya re all set for fall!


A quick clean up tip! Clean your griddle while it is still warm, and the crayons are still melty.  I just used a paper towel to collect any wax I could see on the griddle, followed by a wet cloth.  Then clean however you normally would.


Wednesday, September 26, 2012

Apple Picking

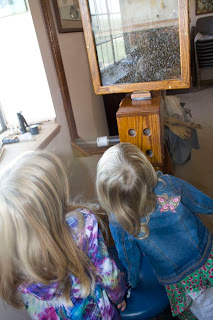
Grandma was taking the kids apple picking, so I went along.  This particular orchard also raises its own honey.  The have a small hive set up where visitors can observe the bees. The hive is connected to a clear tube leading outside, so the bees can fly and collect nectar.

Bees!

The larger queen bee in in the center of this photo; can you spot her?


Bria correctly identified the hive as being made of hexagons.
After watching the bees for a while we headed out to pick apples.  The girls quickly picked any apples they could reach from the ground.  After that we had to try new things like climbing trees and using the apple picker.
Taste testing before we started picking.


Eli was very fond of getting apples out of the bag and putting them back in.
 We had to watch to make sure he didn't put any bad ones in there!
 He was also a big fan of eating them! Or at least taking a few bites.


Once we were finished we had picked a bushel of good apples for the bags and probably another bushel of apples the birds or worms had gotten to.  The owner had kindly left a little wagon for us to use to bring them back.
Bria pulling one 1/2 bushel over to get the second bag.


What a load!
Overall I think it was a successful trip!

Bria spelling apples while Grandma was checking out.