Showing posts with label Recipe. Show all posts

Thursday, August 29, 2013

Garlic Bread Pizza


On a recent trip to Pizza Hut my husband was complaining that they no longer offered their garlic bread pizza.  After thinking for a moment I thought, why can't we make some? And that is just what we did! We took the super easy route and bought frozen Garlic Texas Toast, but I am sure you could make your own garlic bread for the crust. I really liked how think the Texas Toast was though!


Place your garlic bread on a baking sheet and put on your choice of pizza sauce. 


Then add whatever toppings you want. Nathan wanted some sausage on his while the rest of us just had cheese!


Bake until the cheese is melted, and if you used frozen garlic bread, the bread is heated thoroughly. It seriously only takes about 10 minutes! 


We were all quite pleased with how they tasted too!  Just another fun little way to make pizza different, but still easy enough that anyone (other then me) can cook it!

Wednesday, July 17, 2013

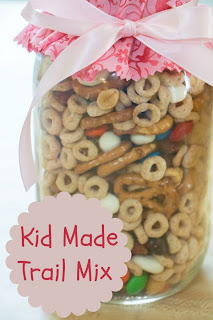
Kid Made Trail Mix


Kid Made Trail Mix

My oldest just finished participating in her first 4-H fair! As a Clover Kid she is allowed to take whatever project she wants and as many as she wants! Luckily she wasn't too ambitious this year choosing only to take some trail mix and the button flower she made at her first meeting.

Trail Mix is such a good thing for this age group to make because there is no wrong way to do it! I let Bria choose her ingredients and how much to add of each (within reason since her first recipe was nothing but M&Ms and peanuts).

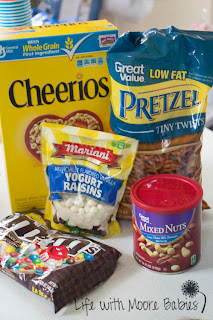
She started with Cheerios, pretzels, mixed nuts, yogurt covered raisins, and M&M's. She added them in that order, stirred gently, and spooned it into a jar.

Trial Mix IngredientsTrail Mix Pretzels


Trial Mix NutsTrial Mix Raisins


Trail Mix M&MsTrial Mix Stir


Trial Mix Trial Mix in Jar

I think she ended up with around 3 C Cheerios, 1 1/2 C pretzels, 1 C nuts, 1 bag yogurt covered raisins, and 1 C M&Ms. We sealed up the jar, and she chose fabric and ribbon for me to add to the top.

Trial Mix Ready for Fair

That evening it was off to the fair! We were lucky and got to be the first ones to talk to the judge (I was worried that Bria would be too nervous to go first, but she was ready)


And she was so proud to go home and tell her dad that she got two green ribbons! 

Clover Kid Trail Mix

After looking at all the other projects later that week I have a feeling we may be a bit more ambitious next year especially since her little sister should be able to participate too! As a side note, if I ever have to be a 4-H judge I want Clover Kids! No judging involved just talking and saying, "well, I think this deserves a green ribbon!" 

Monday, July 1, 2013

Creamy Pudding Pops

creamy pudding pops

Pudding Pops...bring back memories? I used to love pudding pops, and it wasn't until I said something about making some that I realized kids today (at least my kids) have no idea what they are!  So when we picked up some popsicle molds I knew exactly what we would be making!

Not sure if there is an actual recipe for them, but what I used was 1 box of instant, chocolate pudding, 2 C milk, and 1 tub (8 oz) of whipped topping.

To start with mix your milk and pudding just like you were making pudding (whisk for 2 minutes).

pudding pop

Then stir in you whipped topping for that extra creaminess! 

pupping pop cream

pupping pop mix

Once it is pretty much mixed you can spoon the mixture into popsicle molds or disposable cups (and add popsicle sticks) or if you are me you can eat it unfrozen. Freeze the part you want frozen and put any left in the refrigerator (it is like really creamy pudding; trust me, I ate way too much).

pudding pop freeze

Once frozen you pop out of your mold (you may have to use a little hot water for this) and serve! My oldest, upon seeing that it was brown, declared she would not eat it. She wanted a colored popsicle, and even though she watched me mix it and put it in the freezer she still wanted a colored popsicle. The other two were quick to eat theirs though! 


Super simple and super creamy summer treat!  And now that I know my oldest requests colored popsicles we might just have to make her some even though chocolate Pudding Pops still can't be beat in my book!

Thursday, June 20, 2013

Strawberry 7-up Cake


Guess what season it is? Yep! Strawberry Season! And this year we are actually getting a lot of strawberries from our little patch!  The first night I really started picking them, I ended up with about 4 cups! Plenty to make a Strawberry 7-Up Cake!


Strawberry 7-Up Cake may not seem much different then an ordinary jello poke cake at first glance, but the special ingredient 7-Up (or in the case Sprite) makes it super light and fluffy!

Cake Ingredients:

white cake mix with all ingredients listed on mix
3/4 C 7-Up (or other lemon lime soda)
1 Box vanilla pudding
3/4 C hot water
1 Box strawberry jello
3/4 C cold water
sliced strawberries


-Mix cake mix with all ingredients listed on box, pudding, and 7-Up.

-Grease 9x13 pan and bale at 325 degrees until knife inserted in center comes out clean. I usually start by baking it as long as the box recommends and then checking.


-Then you need to add the strawberry part. For this you mix 3/4 C hot water with strawberry jello until dissolved then stir in cold water.

-Using a toothpick or fork prick the top of the cake in several places. Then pour your jello mix all over the top!


-Cover the top with sliced strawberries.


Now for the topping. I use a really creamy yet light topping made with Dream Whip for this cake.

Dream Whip Topping Ingredients

1 Pint 1/2 and 1/2
1 Box vanilla pudding
1 envelope Dream Whip and ingredients listed on box.

-Mix all of the above according to the directions on the box.

-You have to whip it a long time to get it very thick. I left mine whipping and went to do some things and come back to it about 10 minutes later. It will NOT be stiff, but it will hold its shape fairly well.


Spread over the top of the strawberries!


Refrigerate until serving. I would actually recommend you refrigerate for at least an hour, so the topping will set up a little. (Refrigerate for storing too!)


Slice and enjoy!


Super light and fluffy with a delicious strawberries and cream flavor! This is one cake even my husband (the cake hater) will eat!

Friday, May 24, 2013

Little House Maple Candy


We just finished the Little House in the Big Woods and celebrated with our own Maple Candy! To see how we did it go check out my guest post over at Reading List!

Make sure to take a look around Marissa's blog for more book fun and some encouragement too!

Thursday, May 9, 2013

Pistachio Almond Cookies


I wasn't actually planning on blogging these, but they turned out so yummy that I had to! I started with my basic pudding cookie recipe (below) and just changed them up a little. I love how versatile this one recipe is! 

Pudding Cookies

Ingredients

2 1/4 C flour
2 sticks butter, softened
2/3 C brown sugar
3/4 C sugar
2 eggs
1 pkg instant pudding
1 t vanilla
1 t baking soda
2 C chips

Beat butter, sugar, and brown sugar. Add pudding, eggs, and vanilla.

Mix flour and baking soda. Add to mix.

Stir in chips.

Place rounded spoonfuls on cookie sheet and bake for 12 minutes and 350 degrees.

That is the basic recipe that can be altered to make whatever flavor you want. I used it the same day to make chocolate mint cookies by using chocolate fudge pudding mix and chopped Andes mints.

For the Pistachio Almond cookies I used Pistachio pudding mix, chopped almond instead of chips, and almond extract instead of vanilla.  Super easy and yummy! 


I have to say these cookies made my pistachio loving husband very happy!

Monday, March 18, 2013

Chocolate Caramel Supreme Pie


This past week we celebrated Pi Day! Ok, so my kids are way too young to know what Pi is, so we celebrated with Pie. In fact we had "Pi" all day long. For breakfast we at "mock" apple pie made with apples, cinnamon, and crescent rolls, lunch was chicken pot pie, our snack was pineapple, dinner was pizza pie with chocolate caramel supreme pie for dessert. By far the tastiest (at least for those of us with a terrible sweet tooth) was the Chocolate Caramel Supreme Pie, so I thought I would share the recipe!

Ingredients

30 caramels
3 T butter
2 T water
1 chocolate crumb crust
1/2 C chopped pecans
3 oz cream cheese, softened
1/2 C powdered sugar
3/4 C milk chocolate chips
3 T water
8 oz whipped topping

Start by heating the caramels, 3 T butter, and 2 T water over medium. Stir until melted.


Pour the caramel mixture into the chocolate pie crust and sprinkle with pecans (this was the girls job). Then refrigerate for an hour.


Mix together your cream cheese and powdered sugar. Spread over caramel layer. Return to refrigerator while you prepare the whipped topping.


Melt chocolate chips and 3 T water over low stirring until melted. I did not read my own recipe when I made this and used too many chocolate chips. It still worked, but did not turn out as fluffy as normal! Once melted remove from burner and allow to cool to room temperature.


Gently fold together whipped topping and cooled, melted chocolate mix. Spoon over cream cheese layer and refrigerate until serving (at least an hour).


Yum!


I hope you all had a tasty Pi Day too!