Showing posts with label Fun with Food. Show all posts

Wednesday, July 17, 2013

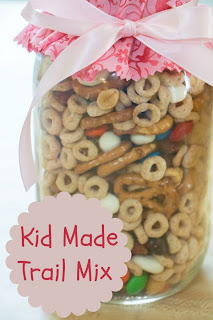
Kid Made Trail Mix


Kid Made Trail Mix

My oldest just finished participating in her first 4-H fair! As a Clover Kid she is allowed to take whatever project she wants and as many as she wants! Luckily she wasn't too ambitious this year choosing only to take some trail mix and the button flower she made at her first meeting.

Trail Mix is such a good thing for this age group to make because there is no wrong way to do it! I let Bria choose her ingredients and how much to add of each (within reason since her first recipe was nothing but M&Ms and peanuts).

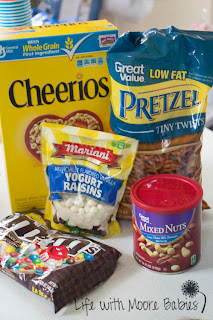
She started with Cheerios, pretzels, mixed nuts, yogurt covered raisins, and M&M's. She added them in that order, stirred gently, and spooned it into a jar.

Trial Mix IngredientsTrail Mix Pretzels


Trial Mix NutsTrial Mix Raisins


Trail Mix M&MsTrial Mix Stir


Trial Mix Trial Mix in Jar

I think she ended up with around 3 C Cheerios, 1 1/2 C pretzels, 1 C nuts, 1 bag yogurt covered raisins, and 1 C M&Ms. We sealed up the jar, and she chose fabric and ribbon for me to add to the top.

Trial Mix Ready for Fair

That evening it was off to the fair! We were lucky and got to be the first ones to talk to the judge (I was worried that Bria would be too nervous to go first, but she was ready)


And she was so proud to go home and tell her dad that she got two green ribbons! 

Clover Kid Trail Mix

After looking at all the other projects later that week I have a feeling we may be a bit more ambitious next year especially since her little sister should be able to participate too! As a side note, if I ever have to be a 4-H judge I want Clover Kids! No judging involved just talking and saying, "well, I think this deserves a green ribbon!" 

Wednesday, July 10, 2013

Teddy Bear Picnic

teddy bear picnic

Happy Teddy Bear Picnic Day!!!   We had our own Teddy Bear Picnic and learned about Food Groups and Sequencing along the way! Visit Gummylump to read all about it!

Monday, June 3, 2013

A Warm Gooey Treat in a Shoebox

You might have heard of pizza box solar ovens, but did you know you can make a simple solar oven using a simple shoebox?  I’m Andrea from No Doubt Learning and thanks to Ashley for allowing me to guest post today so I can share how we make warm, gooey cookies on a scorching hot day.  Not only is this a fun activity to check on throughout the day, but it’s a great educational activity to teach kids about the power of the sun’s heat.


If you’re like us, you probably have a shoebox lying around just waiting for a *special* project.  If you have a day in the upper 90 or 100 degree temperatures, you are set to start baking!
  • Line the bottom of the shoebox with black construction paper, which is helps with heat absorption.
  • Cut a hole in the lid, leaving a 1-inch perimeter around the edge.
  • Tape plastic wrap around all the edges of the lid’s hole to resemble a window (this keeps the heat from escaping the box).
You are ready to start!  Place some cookie dough on a piece of tin foil in the bottom of the box, close the lid securely, and set the shoebox oven out into the backyard where it will have direct sunlight all day.
In the meantime, complete your last step: Cover a large piece of cardboard (such as the side of a cereal box) with foil to act as a reflector.  Angle the reflector to shine the sun’s light directly at your cookie dough.  Tape or prop the reflector in place so the sun continues to reflect on the baking cookies throughout the day.
Wait several hours and check the cookies often to be sure the sunlight is continues to be reflected on the cookie dough. 

After several hours, voila!  You’ll have tasty warm cookies, made in a shoebox in your own backyard.  How cool is that?

Feel free to come visit me for other science and  solar activities.  Or, just let me know you stopped by from Life with Moore Babies!

Andrea lives in California with her husband and two young girls.  She left 11 years of teaching public school to homeschool and she hasn’t looked back!  Connect with her on at her blog No Doubt Learning, Facebook, G+, Twitter, or Pinterest.

Thanks so much to Andrea for sharing this fun (and delicious) way of learning about the suns heat with us! Make sure you stop by her blog, No Doubt Learning, and check out all her fun ideas for teaching!

Monday, April 1, 2013

Marshmallow Sensory Fun


After seeing how much fun they had with marshmallows over at Fantastic Fun and Learning, I thought we should give it a try. We started with a few marshmallows (we had some leftover hearts).


I wanted the girls to think a little more about their senses, so I asked if they could describe how the marshmallows looked, smelled, sounded, felt, and tasted. They looked fluffy, felt soft, and smelled and tasted sweet. The girls didn't think they sounded like anything until they pulled them apart.


Eli found his own way to make the marshmallows make noise...by dropping them! After we added a little water to the bin they even made a little splash!


We decided to add another little experiment to our fun and see what happened when marshmallows are microwaved. Now since they are pretty much sugar filled with air they grow (just like ivory soap)! The girls were quit amazed at how big they got! And how sticky!


We added those big, sticky marshmallows to the water too, and all the kids squished away! The longer they played the squishier the marshmallows got.


Eventually the girls were ready to move on, but I think Eli could have played all day! This will be a fun activity for him this summer in his water table for sure!

Thursday, March 21, 2013

Marbled Pancakes


Pancakes were in my meal plan for breakfast this week; I decided we should try to spruce them up a bit. Normally I would use sprinkles for this, but this time I wanted to try something new.  So we came up with Marbled Pancakes.

You start by putting your batter on the griddle and adding some drips of food coloring. It does not take much! One drip of each color is plenty or a couple drips if you are just using a couple colors.


Then using a toothpick (or butter knife if you are out of toothpicks like me) swirl the color around a bit. Drag the toothpick knife through the colors without stirring. The girls wanted to stir at first, and that would have ended with a mess. I guess they had to learn to be a bit more calm and gentle with these!


Cook the pancake as you normally would. The color will only show up on the one side; some of ours seeped through a little, but it is pretty much one sided.


Cook all you pancakes with a variety of colors and swirls! No two will end up the same! 


The girls really enjoyed eating these as is the first day. We had leftovers for the next day, but they didn't care for them then. They thought they could taste the food coloring. I think when we do this again I will mix the food coloring with a little bit of pancake batter to swirl around. That way it will be a bit less concentrated, but we can still swirl it. The effect won't be exactly the same, but my picky eaters will be happy! They did have a great time making them though!


Monday, March 11, 2013

Nutter Butter Chicks (and Bunnies)


You may remember our Nutter Butter Turkeys or our Nutter Butter Snowmen, and now we are adding some Nutter Butter Chicks! Spring is on its way, so celebrate with some adorable little hatching chick cookies.

We started with Nutter Butters, yellow candy melts, white candy melts (we found marshmallow that were really white), jelly beans, and mini M&Ms.


Melt your yellow candy melts and dip the Nutter Butters, placing on waxed paper to dry.


Before they are dry, add mini M&Ms for eyes (Mini chocolate chips would work too), and half an orange jelly bean for a beak. Then allow to dry completely. We placed ours in the fridge to speed along the process.


Once the yellow is hard (it really doesn't take long), melt the white chips. Carefully dip the bottom and just a little bit of the top in the white and allow to dry on waxed paper.


And you have cute little chicks to welcome spring!


I had a bit of the white left over, so I went ahead and attempted a few bunnies as well.  If you want to try just dip the Nutter Butters in the white and add half a small marshmallow for a tail.


For the ears you cut a large marshmallow into 8 pieces and add to the head.  If the marshmallow won't stick just dip the end in the candy melts and stick on!


The bunnies didn't turn out as well as the chicks, maybe with a little practice! 
Still a sweet way to welcome spring!


Thursday, December 6, 2012

Nutter Butter Snowmen


Last year it was Nutter Butter Turkeys; this year we made Nutter Butter Snowmen! Actually I had intended on making these last winter, even bought the Nutter Butters, and never got around to it! These are super easy; easier then the turkeys! The girls were ecstatic to help (but they usually are when it comes to the kitchen).

Nutter Butter Snowmen

Ingredients:

Nutter Butters
White Candy Melts (or almond bark or white chocolate chips)
Mini M&M's
Airheads

I started by preparing my Airheads to be scarves.  I cut them in thirds lengthwise then in half.


Then you melt your candy melts (or whatever you chose to use).  If you use almond bark or chocolate chips you may need to add a little oil to it, so it will melt smoother.  After it is melted, you dip you Nutter Butters.


Lay them on a waked paper lined baking sheet, and add your scarves, eyes, noses, and buttons. The girls also enjoyed licking the chocolate off their fingers when they finished this step.


The girls liked to leave their scarves blowing in the wind. I folded mine down a little.


Once they were decorated I stuck them in the freezer to harden a few minutes.


Yummy Snowmen to eat or share!