Showing posts with label Glow. Show all posts

Thursday, November 1, 2012

Space Sensory Bin

 My original plan for the space sensory bin was to make moon sand, but my moon sand didn't turn out right. It was still fun for play as Sandy Oobleck, but definitely not moon sand!  We did find a little package of glowing sand at the store a while back; I decided this would  be a good time to try it!.

 Product Image

I was a bit disappointed when I read the instructions, and it said it would only glow for 4 hours!  I was hoping it would recharge like glow in the dark stars do.  We already had it, so we needed to use it.  It came with 3 tiny pouches of sand (3 different colors).  The girls had to mix it to activate the glow.  


Then we added it to the bin, followed by the glowing planets.  I had the girls tell me the planets in order from the sun (center of the bin) as we put them in. Then I let them add all the stars.

Bin in the light.

Glowing bin.

Bria was most interested in sorting the stars by size.  Nadia was intrigued by the fact that every time the camera flashed the stars glowed brighter.  Obviously the pictures were either glowing box or kids.  I couldn't get a good picture where you could appreciate both.  If you are wondering about the clothes and shoe, they are in their closet.

She wanted me to flash the sun again.


After they were finished they removed all the stars and planets and mixed all the sand together.  I helped them make the Milky Way (sort of).


After Eli got up we carefully let him see the glowing sand.  He squealed a few times and then reached to grab it.  I knew he would try to eat it, so his hands were not allowed! They were all fascinated by the glow effect, and the girls were really excited when I told them we could hang some of the stars in their room after they were washed!


Tuesday, July 31, 2012

Egg Carton Ladybugs and Fireflies


I had been planning on making a version of these ladybugs I had seen on GoGreen, but hadn't got around to it.  Then last weeks story time was about fireflies which gave me the idea to make fireflies as well!  To make these you need a cardboard egg carton, scissors, paint, pipe cleaners,  medium pom poms, glue (we used hot glue), and  glow paint.

I started by cutting up my egg carton into what would become 12 individual bugs.  I saved the top to use as a paint tray.


Then I had the girls each paint 6 bugs. Bria only wanted to do 4, so I got to make 2.   I did end up cutting more off the bottom of them, so they would lay flat on the table.  


After letting them dry we started putting spots on them.  I had the girls use Q-tips to do this.  I tried adding the glow paint to mine, but decided it would be better to do it at the very end since it takes a while to dry.


I cut the pipe cleaners in half, folded the halves in half, and hot glued them to the egg carton.


Then I glued a pom pom on top of that for the head.


I curled the pipe cleaner anntenae, and had the girls paint the glow in the dark glue on their fireflies.


And we had bugs!

Ladybugs (watch out for that baby)

Fireflies

I tried to get a picture of one glowing, but they really don't photograph well (especially in the girls closet).


Tuesday, June 12, 2012

Glowing Water Beads

     The girls always enjoy playing with slippery, little water beads, so when I learned of a way to make them "glow," I started digging out our black light.  Yes, you need a black light of some sort, so it isn't truly glowing.  It is still really cool though!


     To start with you need clear water beads (check the floral department of most any store (our tiny Wal-Mart even had them), highlighters, and a black light.  You have to start by taking the highlighters apart to get to the inner marker section.I found squishing the end with pliers and then prying it apart with a butter knife worked well.


      Run the marker part under water to get out all the ink.  I had my water at a very slow stream and squeezed the ink out to keep it as concentrated as I could.


     Place your water beads in a bowl (1 bowl per color) and add your colored water.  Wait for them to get all puffy and smooth.  I underestimated the number of water beads I had, so I ended up having to dilute my color with more water in order to get them all puffed up.  Once they are fully engorged with water they are ready to play with!

Right after placing them in the water.

Found a blue and a pink highlighter to try too.

Ready to go!

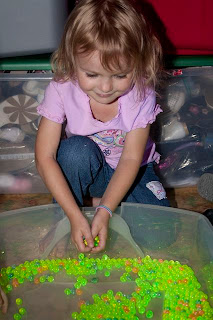
     This is where you need the black light. Add the beads to whatever dish you want to play with them in and place them in a dark room with very little light other then the black light.  We went into the girls closet, but left the door open, so I could take pictures of them.

Our set up with the black light sitting next to the beads.


Eli had to get in the fun literally!


     I think they would have played all day! Eli tried to stick them in his mouth a couple times, but quickly learned it was more fun to throw them.  He also kept climbing into the container, but that ended with nap time.  The girls continued playing a bit longer even with the lights on.  The glowing was cool, but really water beads are just a lot of fun!


Look at them glow!