Showing posts with label DIY. Show all posts

Monday, November 4, 2013

DIY Light Table


A light box is something I have always thought my kids would enjoy, but I never wanted to spend the money on one. Finally I got around to making our own. I used a large, clear, Rubbermaid container, two strands of Christmas lights, and press and seal wrap (love that stuff).  I lined the bottom of the container with the press and seal wrap (the top may have been a better idea, and I may do it too), and I stuck the lights inside! All done, homemade light table!


I had found these cute little fall themed plastic pieces at Target that would be perfect for the light table. The girls were enthralled with it!


They made patterns....


And shapes....


And more patterns!


Then I got out some Easter grass and made a pumpkin patch!


After their Lego people had collected all the pumpkins we got out our tiny crystal ponies; because nothing can be done without ponies! 


Overall the girls were quite pleased with their little light table (I was too) and played with it most of the afternoon!  And bonus, you can store all the lights in it!

Thursday, October 4, 2012

DIY Mermaid Tail Tutu


Nadia's forth birthday is coming up, and she selected mermaids as her theme.  In an attempt to dress them as mermaids I made both her and Bria mermaid tail tutus.  I saw a really cute version on pinterest, but it went to an etsy store where the costume was already sold; no instructions! So, I made it up as I went along.  I wasn't even sure if I would blog about these, so please excuse the lack of pictures (especially in the beginning stages).

So you start by making a basic tutu that goes to the floor.  I make mine by cutting a piece of ribbon about a foot longer then the waist size I need.  I use the tulle that some son a spool rather then the large pieces you can buy on the bolt because it cuts down on the cutting.  I cut my tulle pieces twice the length I want the final product.  After cutting the tulle (or a lot of tulle) I start placing on the ribbon.  I find the center and place it under the tulle.


Then I take the ends and put them through the hole between the ribbon and the tulle. (This is really hard to see with tulle, but it is the same technique I used for the patriotic ribbon rings).


And tighten.


Repeat with each piece until you have enough to go around the waist.  If you want it fuller you can squeeze them together and add more pieces.

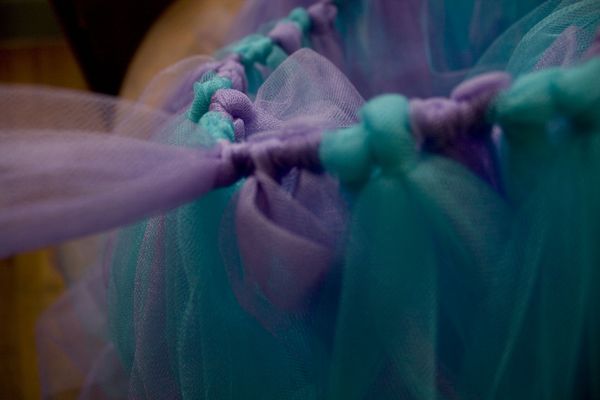
For these particular tutus I used 2 colors on each and did strips alternating colors every 2 pieces.  However to make the crisscross design I added a third piece to every other group of that color. That sounds really confusing to me! For example the blue and green tutu with the green crisscrosses would go 2 green, 2 blue, 3 green, 2 blue, 2 green, 2 blue, 3 green, 2 blue......make more sense? That third piece is what you pull out to make the crisscrosses later.

Once you have your tutu made try it on the child, so you can figure out where to place the tulle to make the tail.  I really wanted it put it lower and get more of a mermaid look, but the girls said they couldn't walk.  I measured loosely where they felt comfortable and cut a piece of tulle that length to tie around that section.


After tying the bottom I pulled out all those extra, third pieces.  Each piece has 2 tails, one will go left and the other right.  So you tie the left tail of one to the right tail of the other using a square knot (so it won't slip). Do this all the way around even in the back.  You can still untie the tutu to make it easy to step into and out of.  Otherwise you can use elastic instead of ribbon and just slip it on.

Extra piece

First row
After the top row in done you do the next row down in the same way using the tails from the previous knots.

You now use the knot tails.

Second row.

And again with the next row.

Again with the knot tails.
Third row
The last row I tied the bottom piece of tulle into each knot to keep it all together.  Make sure you smooth all the inside pieces throughout the process, or they just get all lumpy and in the way!

After the first throw of your knot add the bottom piece in the center and make your knot around it.

Holds it all together
All tied together and ready for jewels!

The last thing I did was hot glue some little jewels to each knot for some extra shimmer.


I didn't get pictures of Nadia's after the first little bit because she was in a big hurry to get it done and help glue the jewels on.  But here they are!

What I get when I tell them to stand close together.

And what happens a few seconds later.
I haven't figured out what shirts we will wear with them yet, but at least the tutus are cute!  The girls are pretty excited about them too!

Here are my attempts at photographing them with Eli dressed as a pirate! 


Thursday, September 27, 2012

DIY Foam Wall Decorations

When decorating Eli's nursery, I was looking for something to put over his crib that fit my robot theme.  I was really hoping to find some gears. I did find some vinyl ones on ebay, but they were pricey and pretty limited in size and color.  So I decided to make my own out of fun foam!  Here is Eli's room before he was born.


The robots are re-positional stickers I found on amazon.

And the gears are fun foam wall stickers I made.
Now, we have had to add a pet net in the far corner above the lamp, so we can control the over abundance of stuffed animals that we have. While putting it up, Nathan knocked down one of the gears. No problem, with the way it was adhered it was easy to repair.  Of course I had to find a new place for it because of the pet net.  I decided to place it on another small wall with nothing on it just out of Eli's reach.  Luckily if Eli does get a hold of it, it is very light weight!

If you want to make your own fun foam wall decorations you have to first start by cutting out your shape.  I used a flash light with a picture of a gear taped to it as a projector to trace my gears on my fun foam.  Of course you can use a real projector or free hand it.  Then cut it out.

My shape (you can see the marks where I drew it, so this is the back).

Lay down newspaper or trash bags and spray the back of your shape with spray adhesive.  I used Elmer's brand, but I would guess most spray adhesives have a temporary bond option.  That is what you want to use.  For the Elmer's brand you let it sit for 3-5 minutes before applying it if you wanted a temporary bond.


Adhere to your surface by firmly pressing all over the shape.

My little gear in its new place.
If you want to remove it simple lift up a corner and pull. It comes off cleanly.  I did practice in the girls closet a couple times to make sure I was letting it sit long enough before adhering it because if it doesn't sit, it doesn't come off well!

So here is the new room; not much has changed. Bria did inform me that she didn't like the gears overlapping because it looked like they were attacking each other.

The green gear used to be above the red one.

Now it has its own little wall where Eli can see it easier.


Tuesday, August 14, 2012

Scented Play Dough


After not having play dough last week and then not being able to find any at Wal-Mart due to remodels, I decided to try to make my own.  I had never made play dough before, so this was a new experience.  I wanted to make it safe for Eli to play with and fun for the girls.  I decided to make some scented play dough for them to use with their little ice cream set.  I found a recipe for all natural scented and dyed play dough on Olive Juice Mama. I only wanted to make chocolate, vanilla, and strawberry for now, but I will likely be back to try more scents in the future.

The play dough recipe!

Ingredients:

1 cup flour
1/2 cup salt
2 tsp cream of tartar
1 tbsp vegetable oil
1 cup water
food coloring (or whatever you use for scents or dyes)

Mix everything in a pot over low heat until it starts to pull away from the pot into a ball.  I am impatient and this was taking way too long, so I upped my heat to medium-low and it only took about 20 minutes. 

Put the cooked dough on wax paper and knead a little to smooth it out.  I stirred mine a lot in the pan before getting it out, so it was pretty smooth when I got it out.  Unfortunately it was also a bit sticky since I increased the heat.  As it cooled most of the stickiness went away.

For the vanilla I simply added 1 T vanilla extract.


For the chocolate, I added 3 T cocoa.


For the strawberry I added 1 T strawberry extract as well as some dye I made from frozen strawberries.  To make the dye I boiled 1 C of frozen strawberries in 1 C of water and then simmered for 15 minutes.  I only used about half of the dye I made.


The girls really liked how it smelled and that it was so much softer then regular play dough.  They didn't really like the fact that it was still a little sticky. They had to keep a wet rag near by to wipe their hands on, so I guess next time I make it I will have to be a bit more patient.  They also both had to try it; which I don't really blame them for because it did smell delicious!  Of course it did NOT taste delicious! It is super salty, but safe to eat.


Eli definitely thought it was for eating, and tried several times.  All results ended in the same icky face.  He did enjoy poking it with his fingers and trying to run away with it.


It should be fun to come up with more color and scent combinations in the future. Who knows, maybe the girls will even help!


Photobucket