Showing posts with label Art. Show all posts

Sunday, September 1, 2013

Bottle "Glass" Sculpture


We recently got home from what is becoming our annual trip to Indianapolis. While we were there, we had to visit the Indianapolis Children's Museum! This year Eli was even more into all the exhibits since he was a year older! The girls had a great time exploring again, and Bria even remembered where things were! One of the favorites is still the large Chihuly sculpture in the center of the museum, and of course the area where you get to put together large plastic pieces made to look like the glass pieces in the sculpture. 


Last year when we got home we made our own version of glass sculptures


While my aunt and I discussed how we might be able to replicate it for kids, I had no idea she had made her own version with one of her art classes! And she won her school an awesome prize with it too! So while we were out there this year we started one with her (and finished it at home when we had more materials).  I cannot take any credit for this awesome craft; it was all my aunt's idea! 

First you need the really cheap, thin water bottles with their labels removed. Gather a bunch of them and color them all with permanent markers. Any permanent marker will do; we have a ton of Sharpies, so that is what we used at home. 


The starting just a little above the bottom, cut the bottle in a spiral almost all the way up! 


At this point my kids found they were a lot of fun to play with like this.  The girls also enjoyed coloring designs on the bottle and then watching how the designs changed once the bottles were cut!


Once we were home and had gone through the rest of that case of water, we finished coloring and cutting the bottles. Then you need some sort of wire. We used a coat hanger. We opened the top and threaded on the bottles on. Once they were all there we closed it back up and it was ready to hang. My aunt used pipe cleaners to attach her classes bottles to a large, circular wire.


Once you have them all attached, hang and enjoy! Here are a few pictures of ours! It finally ended up in the play room in front of a window because I wasn't sure it would hold up to wind and rain.


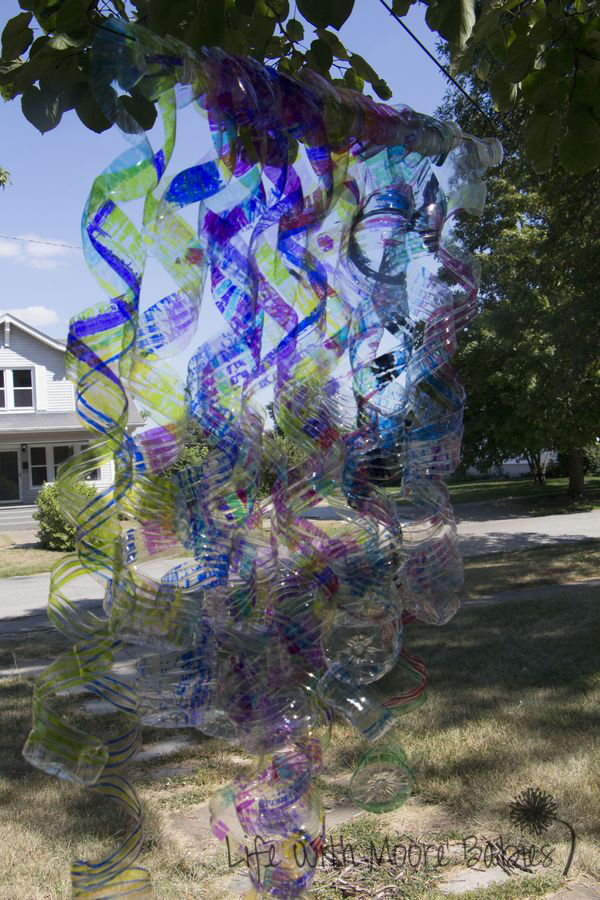
May not be as impressive as the Chihuly sculpture, but it is still quite pretty (and much safer for little hands). You could make one as big or small as you want, and it is fairly mess free as long as your little ones can handle markers well. Definitely a fun art project! A big thank you to my lovely aunt for sharing it with my kids (and now all my readers)!

Sunday, August 25, 2013

Watercolor Effects


Have you checked out the fun Watercolor Techniques we tried out over at Gummylump? If not, head over there and see what happened!

Friday, August 2, 2013

Party Popper Art

Party Popper Art

More fun with fireworks! this time we made art! Visit To the Moon and Back to check it out, and while you are there make sure to link up in the Bee Crafty Kids link party!

Tuesday, July 23, 2013

Mom's Library with Unique Art for Kids


Welcome to Mom's Library!


Filled with parenting tips, activities for young children, devotionals, crafts, recipes, and more!
Check back again and again to see the new posts!

(We have a great Giveaway too!)

 If you enjoy the link party, please follow Life with Moore Babies by email or RSS feed.

You can also follow us on FacebookGoogle +Twitter, or Pinterest!


Unique Art Features This Week! 


No Doubt Learning shared a cute, Beginner Sewing Project!


Buggy and Buddy made some amazing Salt Art!


My Nearest and Dearest made Magic Trees!


Play, Learn, Love painted by Dancing!


Enchanted Homeschooling Mom shared some Foil Painting (that we happened to do)


If I have featured you please feel free to grab my featured button!

For more great features visit my fellow Librarians (Please follow them too!):


Want to see all the great posts added last week? Click HERE to see the whole collection!

Want to see even more featured posts? Follow the Mom's Library Pinterest Board!

Our Giveaway this week is from Free Piano Lessons for Kids!  You can access the lessons online for free, but if you want the printables to go along with the lessons you have to buy (or win) them! For a full review visit True Aim! 


And if that wasn't enough Crystal's Tiny Treasures has a giveaway going on for Julia Dweck's newest book Blucy! I am sure this is an adorable book, and can't wait to read it myself!


Would you like to Participate?


If you are new and would like to link up please checkout the Mom's Library Page.Support your fellow bloggers and comment on at least 2 other links.

Thank you for participating; we love to see your ideas! Please grab the button and share!


parents as teachers

*By linking up, you are granting me permission to use and/or re-post photographs from your blog or website.


Wednesday, July 10, 2013

Foil Painting

Have you ever tried painting on foil with less then stunning results? We finally found a way to make pretty, shiny picture with it! Check it out over at Enchanted Homeschooling Mom!

foil paintingfoil painting


Make sure you check out her Christmas in July deal too; it ends tomorrow and is the best deal you will see for long time!


Monday, May 27, 2013

Coffee Filter Peacocks


Remember the coffee filter art we made for our N is for Nurse post? We used them to make peacocks!
Not only are they cute peacocks, but they make cute sun catchers! This is why you want the colors to be vibrant!

Once we had soaked our coffee filters with the syringes, we left them to dry over night. I think they would have been dry sooner, but we put it off. The next day I cut the filters in half. I tried to use my scrapbooking cutter, but it tore the filters (guess I need a new blade), so the easiest way I found to cut them was to fold them in half and in half again cutting along your second fold.


 Using dark colors, we had purple, blue, and black, cut out bodies for your peacocks. Ours don't look exactly like peacocks because I used my cricut to cut quails and then I cut off their tails and feet. You could certainly cut out your own bodies or purchase a cricut cartridge that has one in it. Whatever you choose, just cut peacock bodies.

Now it is super simple for the kids to do because they can just glue the bodies on the coffee filters which become the tails!


Once they finish gluing the peacock bodies on, display them in a sunny window! We actually only had cloudy windows today, but they are still pretty peacocks!


 Amazing how versatile coffee filters are! What have you made with them???

Wednesday, May 22, 2013

N is for Nurse


Our second Community Helper for N is Nurse! Obviously the girls are familiar with nurses from their own visits to the doctor. We could have done some activities similar to what we did when we talked about D is for Doctor, but I decided to do something different. So we also talked about how nurses administer medicine and give shots and just all around take care of the patients. Then, I put together a little activity using syringes.

We started by making paper nurses hats to wear; after all they need to be properly dressed! Here are the instructions we used for the Nurse Hat.  The girls each decorated their own, so instead of having a red cross, we had a pink and purple one.


While they colored, I set up our medication station. I had three containers with colored water (you have to use lots of food coloring to get the colors pretty dark). Then I gave them small medicine cups to mix colors in and syringes to draw up the water in.  I also set out coffee filters for them to administer their medicine to!


They always enjoy mixing up new colors and this was no exception. They filled the medicine cups with new colors and soaked bunches of coffee filters! 


I laid the filters on newspaper to dry, and while they are pretty as is, I have more plans in mind for them (hope you come back to see them)!


After we pretended to be nurses, we took a little trip to a local nursing home (forgot my camera, so please excuse the phone pictures).  Now I have to be honest, we didn't visit the nurses because we don't actually know any of them. We know the girls Aunt that works in occupational therapy there, and since the girls hadn't been there for a long time (and Eli never has been), I thought it best to keep with someone we knew this time. So they played with some of the things in the therapy room, and we walked around visiting with some of the residents and passing out cookies.


I think it was good that we didn't try to go visiting without someone we knew. All the kids acted a bit shy, but Nadia was glued to me. Next time should be easier, and we can always take our favorite nurse at the pediatrician some cookies when we go for check ups in a couple months!