Showing posts with label Transportation. Show all posts

Friday, September 21, 2012

Paper Airplanes


Yes, this is a post about simple paper airplanes.  I am always amazed by the number of people I come across that do not know how to fold a boring old paper airplane it comes up more then you would imagine)! The girls are not really old enough to make their own airplanes yet (at least not if they want them to fly), but they do enjoy throwing them! Besides we have already talked about land vehicles and boats this week!

Start with a rectangular sheet of paper. I happened to use construction paper, so ours would be a pretty color.  It is easier with thinner paper though!


Fold the paper in half lengthwise.


Unfold the paper.


Bring one corner of the paper to the center, make a crease.


Bring the second corner to the center, make a crease.


Now bring the crease you just made to the center.


And bring the second crease to the center.


Repeat by again bring the crease to the center.


And again. This is the minimum number of times you have to do it to get an airplane, but the same step can be repeated as much as your paper allows to give you a thinner, faster airplane.


Flip the plane over.


Fold on your center crease, except you will be folding it the opposite way.


What it should look like once you let go of the crease. The fold underneath is where you hold it to launch it.


From the top now. You may have to fluff out the wings to get them to sit straight.
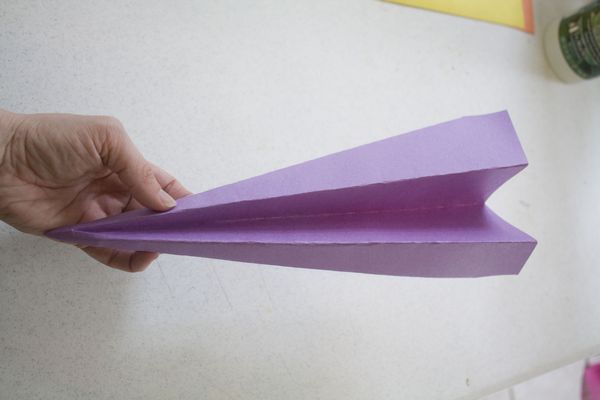

Ready for launch.


Hopefully that all made sense, and you now have a paper airplane. I made 2 more, and these I folded a little smaller.


We took them outside and I asked the girls which one they thought would fly the fastest!


Bria said yellow, and Nadia said purple.  I gave Eli the orange one, so the yellow was fastest! Then Bria wanted the purple one fast, so I refolded it.


They had a lot of fun throwing them and trying to race them.


Unfortunately we also got to learn what happens when a paper airplane gets wet. Since the pool was still up from out Balloon Boats, Eli decided his plane needed to fly (or crash) in it.


Of course it was no longer a plane, and Eli proceeded to shred it in the pool.  The girls still enjoyed their planes though!  Once they are a little older we will have to try some fancier versions, but for now we will stick with simple!


Thursday, September 20, 2012

Balloon Boats


I saw these a while ago on A Little Learning for Two and have been waiting for the right time to try it.  Since we were already on the subject of transportation this week I figured this would be a good time!

Our supplies included a container for the boat, hole punch, straw, rubber band, balloon, and hot glue. I started with 2 plastic mushroom containers.


They had low sides and flat bottoms, so I figured they would be pretty stable.  I used a hole punch to make a hole in one of the short sides of each boat.


Then I took a balloon and rubber banded it onto a straw,


I stuck the straw through the hole in the boat with the balloon on the inside of the boat.


Then I hot glued around it on both sides (A Little Learning for Two used blue tack, but the best I had was hot glue). Excuse the poor glue job; it was hard for me to get around the straw!


Once they were dry, I filled the pool up a little, and we headed outside to try them out.  At first I blew up the balloons and the girls took them, holding the straws tightly, and released them in the water.  They enjoyed watching them go.  It did take them a little while to figure out that the air from the balloon was what was making the boats move.


Bria figured out how to blow up her own balloon! 


I hadn't bothered to blow the pool up completely before filling it figuring we would just put it away after this. This was much too inviting for Eli though, and before I knew it he was soaked! Of course, the girls had to join in. 


Giant Car Graphing


Thinking about all the types of toy vehicles we have got me thinking about graphing them.  This is the first time I had introduced graphs to the girls, so I needed it to be pretty easy.  I decided to me a giant bar graph on the kitchen floor with painters tape.  Then the girls could make the bars by separating the vehicles by type.  (Please ignore the towels in the background waiting to be washed; it is laundry day).


So I started by making the lines for the graph.  I told the girls each tile would be a measure of 5, so only 5 cars could go in each tile.


They started categorizing the cars.  For a while we had SUV's and vans separate, but it was hard for the girls to tell the difference with some of their toys, so we combined them.


We actually didn't have room for all the cars, so we just stopped after we ran out of other vehicles.  Once we had them all in lines, the girls counted the vehicles in each line, and I helped them make a graph on a piece of paper.


As soon as they finished the graph they just wanted to play with the cars on the blue tape!  Then Eli got up, and the cars went everywhere!